Configure the Auro-Codec Encoded Mix
The renown Auro-Codec lets you distribute your immersive mix via one single file (2D + 3D formats in a single carrier).
5.1 Surround and 7.1 mixes are available on many systems in uncompressed PCM quality,
and systems equipped with an Auro-Decoder will be able to playback the original AURO-3D® mix.
The Auro-Codec Menu lets you configure the Auro-Codec encoder before exporting the encoded mix:
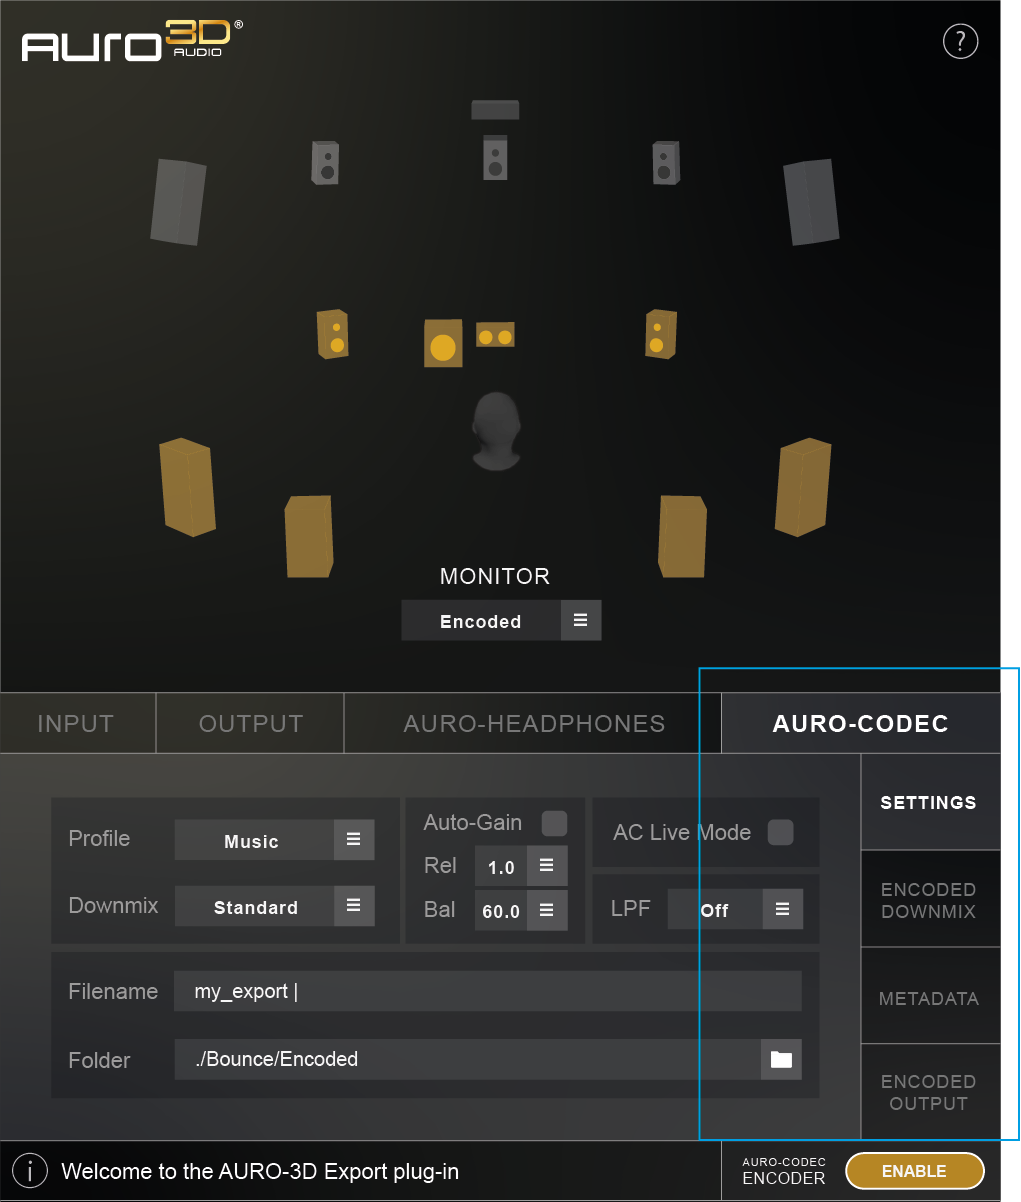
Figure 3 – 7 | Auro-Codec Menu Overview
This menu is divided in four submenus:
• Auro-Codec Menu | Settings: Allows to configure the behaviour of the encoded mix and select export options.
• Auro-Codec Menu | Encoded Downmix: Lets adjust the downmix levels of the surround Encoded Downmix.
• Auro-Codec Menu | Metadata: Lets adjust the levels of the stereo downmix and configure the default behaviour of the automatic upmixer Auro-Matic.
• Auro-Codec Menu | Encoded Output: Allows to inspect the output meters of the surround encoded mix.
Auro-Codec Menu | Settings
The submenu Settings from the Auro-Codec Menu allows you to configure the behaviour of the encoded mix and select export options.
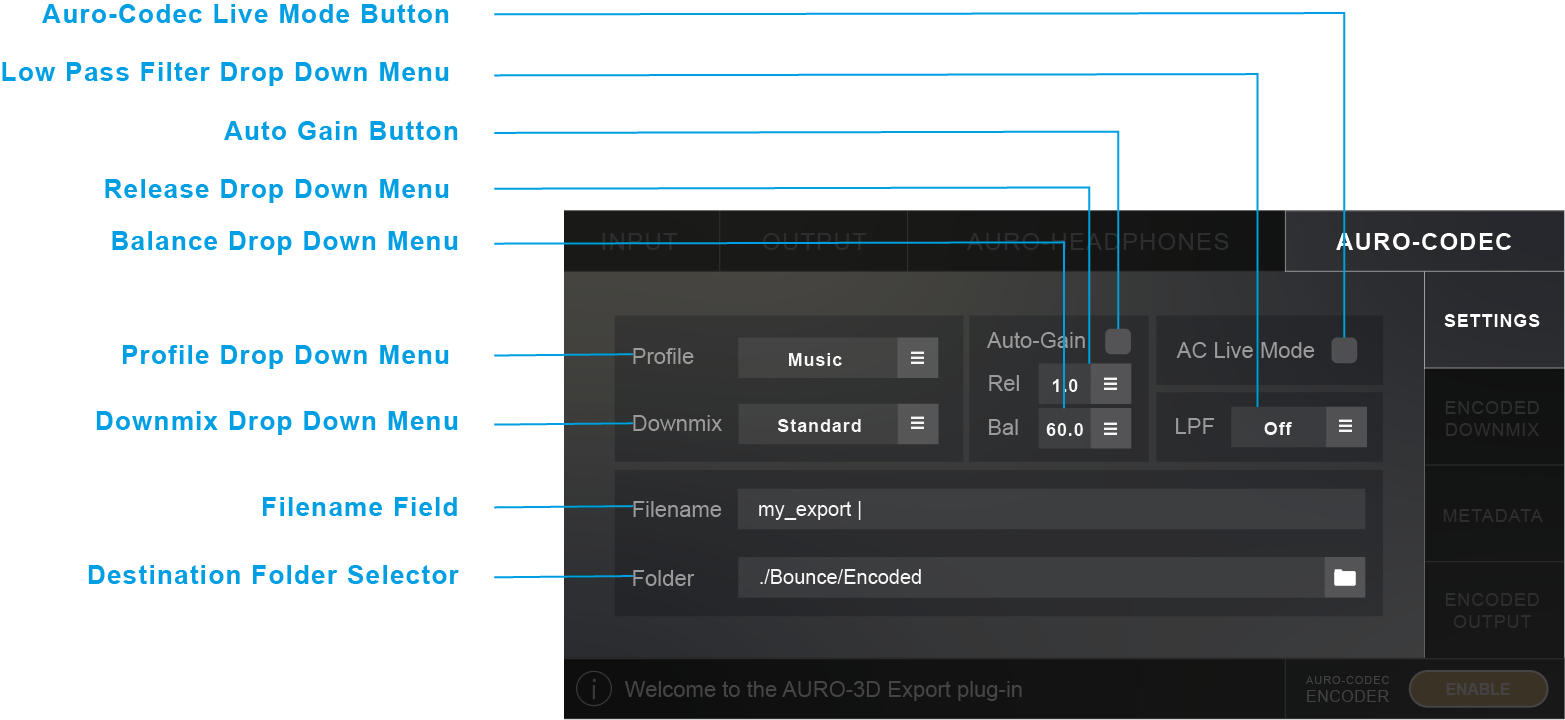
Figure 3 – 8 | Overview of the Settings Submenu from the Auro-Codec Menu
Auro-Codec Live Mode Button
When activated, the Auro-Codec Live Mode Button (AC Live Mode) makes the export process start right after pressing the Auro-Codec Encoder Export Button, even if playback is not running. It is then possible to stop the export process after pressing the Auro-Codec Encoder Export Button again.
This mode is particularly useful for live performance scenarios.
When the Auro-Codec Live Mode Button is not activated, pressing the Auro-Codec Encoder Export Button sets the plugin to “Rec Ready” (flashing button).
In that case, the export process will then only begin after starting playback, and will only end after stopping it.
This mode is particularly useful for exporting the encoded mix in post production context.
Low Pass Filter Drop Down Menu
The Low-pass dropdown menu lets you apply a low-pass filter to the output of the mix.
Cut-off frequencies of 18 kHz, 19 kHz and 20 kHz are available.
This filter is disabled by default (set to Off).
Auto Gain Button
When activated, the Auto Gain Button automatically trims the Encoded Downmix levels to avoid potential audio saturation in certain encoded channels.
This problematic saturation can occur during the encoding process after summing 2 or 3 channels (e.g. L and HL channels, or L, HL and T channels) into one encoded channel (e.g. encoded L channel).
The behaviour of this dynamic tool can be adjusted thanks to the Release Drop Down Menu and the Balance Drop Down Menu.
Note that the effect of the Auto Gain mechanism can be observed in real time in the Auro-Codec Encoded Downmix Submenu.
Release Drop Down Menu
The Release Drop Down Menu is only accessible if the Auto Gain Button is activated.
The release correspond to the total time that is needed for the signal to return to its original state after being trimmed by the Auto Gain mechanism.
Release times of 0.1, 0.5, 1, 5, 10 and 50 seconds are available.
Its value is set to 1 second by default.
Balance Drop Down Menu
The Balance Drop Down Menu is only accessible if the Auto Gain Button is activated.
This parameter lets you modify the behaviour of the Auto Gain mechanism.
Its default value “50” implies that the trim effects will be identical and equally applied to all channels.
Lower values (e.g. 30, 40) cause the lower channels to be more subjected to the trim effects.
Inversely, higher values (e.g. 60, 70) cause the height channels to be more subjected to the trim effects.
Profile Drop Down Menu
The Profile menu contains a collection of Encoder Profiles for different target applications.
![]() The AURO-3D plugin only provides the profile “Music” at the moment. More profiles will be available soon.
The AURO-3D plugin only provides the profile “Music” at the moment. More profiles will be available soon.
Downmix Drop Down Menu
The Downmix Drop Down Menu lets you set the downmix behaviour to Standard Mode or Custom Mode.
The Standard Mode bypasses the Encoded Downmix trims and Auto Gain values set manually by the user.
This mode will instead apply an automatic downmix with fixed Auto Gain.
In Custom Mode, the Encoded Downmix trims and Auto Gain values set manually by the user will be implemented in the resultant exports.
Filename Field
The Filename Field lets you enter the name of the encoded files to be exported.
Destination Folder
The Destination Folder Selector lets you choose the folder wherein the encoded files will be exported.
The desired folder can be selected by pressing the white folder icon.
Note that those paths will be stored in the drop down menu next to the icon.
It is then possible to select the existing paths by simply clicking the folder’s name.
Auro-Codec Menu | Encoded Downmix
The submenu Encoded Downmix lets you creatively and dynamically control the downmix that encodes Auro-3D content into a Surround carrier.
It is possible to automate the channel attenuations so you have complete dynamic control.
When the encoded carrier plays through a surround system, these levels determine how the source channels are mixed
together.
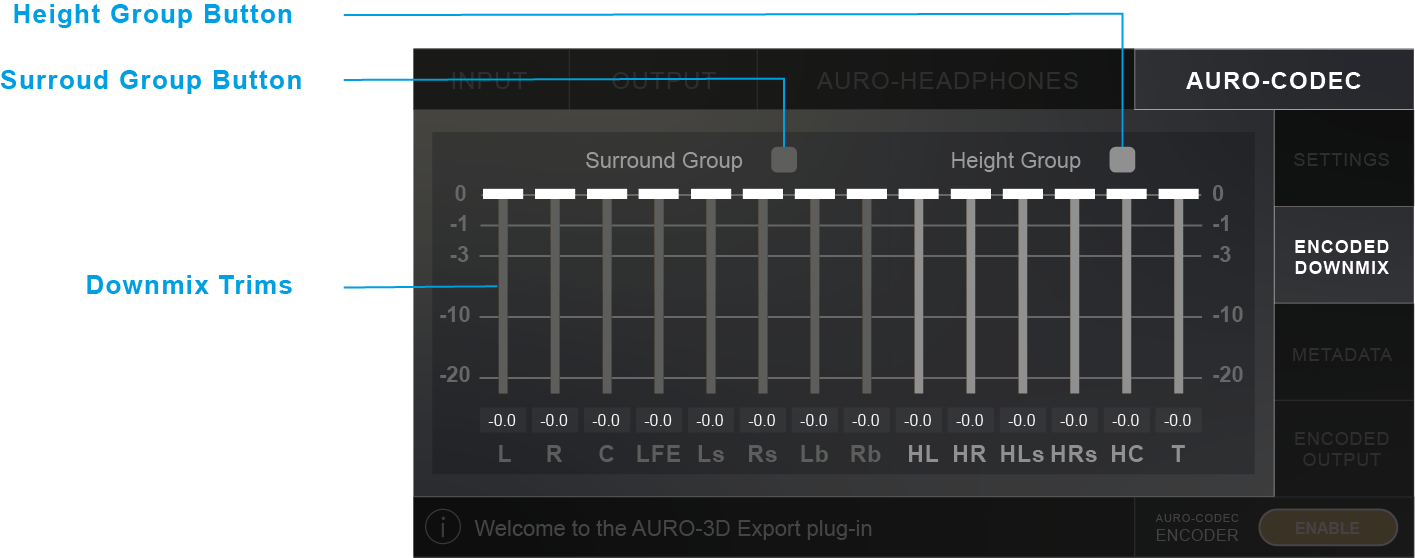
Figure 3 – 9 | Overview of the Encoded Downmix Submenu from the Auro-Codec Menu
Height Group Button
The channel trims for the Height layer can be linked together.
Clicking the Group layer toggle button links the channel trims.
When active, dragging one channel trim up or down also moves the others.
Lower Group Button
The channel trims for the Lower layer can be linked together.
Clicking the Group layer toggle button links the channel trims.
When active, dragging one channel trim up or down also moves the others.
Downmix Trims
Each source channel’s level can be attenuated for the downmix.
Only negative values are allowed because downmixing already creates a rise in level.
The channel trims can be set three ways:
• Click and drag the fader.
• Click in the path of the fader.
• Double-click the numerical field below the fader and enter a value.
Auro-Codec Menu | Metadata
The Metadata submenu contains stereo downmix trims, Native Content switch and Auro-Matic Preset and Strength.
Auro-Matic® is a unique technology that transforms legacy Mono, Stereo and Surround content into a natural 3D or 2D listening experience.
All this information will be exported in the metadata of the encoded file.
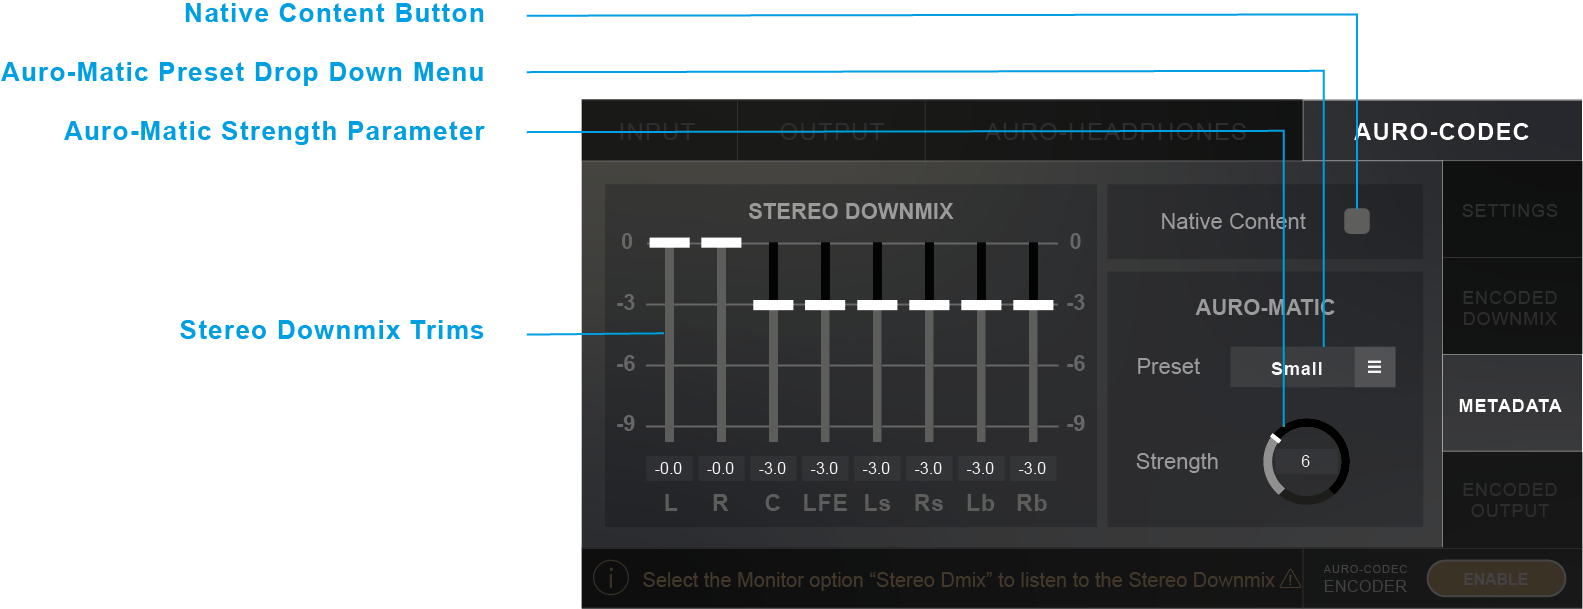
Figure 3 – 10 | Overview of the Metadata Submenu from the Auro-Codec Menu
Native Content Button
Content that originates from an original AURO-3D recording or mix is considered Native.
The Native Content checkbox is enabled by default.
Do not select the Native Content checkbox for content that originates from upmixed mono, stereo, or surround material.
Auro-Matic Preset Drop Down Menu
The Auro-Matic Presets supply precise instructions for the Auro-Matic upmixing algorithm to use when playing this content back through an Auro-3D configuration.
There are 5 Auro-Matic Presets available:
• Small: Set a small upmixing effect.
• Medium: Set a medium upmixing effect.
• Large: Set a large upmixing effect.
• Movie: Ideal upmixing algorithm for watching movies.
• Speech: Ideal upmixing algorithm for optimising dialogues.
Auro-Matic Strength Parameter
The Auro-Matic Preset Strength level defines how audible will be the upmixing effect by default.
The minimum value “0” means that the upmixing effect will not be audible at all, while the maximum value “15” applies 100% of the upmixing effect.
Stereo Downmix Trims
The Stereo Downmix trims let you adjust how a 5.1 encoded carrier will be downmixed when played back on a stereo configuration.
The channel trims can be set three ways:
• Click and drag the fader.
• Click in the path of the fader.
• Double-click the numerical field below the fader and enter a value.
Auro-Codec Menu | Encoded Output
The Encoded Output submenu lets you inspect the output levels of the encoded mix:

Figure 3 – 11 | Overview of the Encoded Output Submenu from the Auro-Codec Menu
Encoded Output Meters
The total number of displayed Output Meters is defined by the track format.
Each meter is labelled by its corresponding encoded channel and dynamically indicates the output level in dBFS.
The colours of the Output Meters indicate if the encoded channels are currently audible or not:
• Yellow Encoded Output Meter: The corresponding encoded channel is currently active and can be audible during playback.
• Black Encoded Output Meter: The corresponding encoded channel is not active.
Note that the Virtual Speakers and the Virtual Headphones share the same colour’s logic than the Output Meters.
Clipping Leds
The colour of the Clipping Led indicates if the corresponding encoded channel is clipping or not.
It is possible reset Clipping Leds by clicking them.
• Red Clipping Led: The corresponding encoded channel did clip.
• Black Clipping Led: The corresponding encoded channel did not clip.